Deburring Tips for 2026: A Practical Engineer’s Guide
14 August 2026Here are 10 deburring tips for 2026 that mechanical and manufacturing engineers can apply immediately to reduce rework, preserve tolerances, and integrate modern abrasive technologies into both manual and automated workflows.
- Test on scrap first. Validate any new tool, speed, or abrasive on representative scrap before committing to production runs.
- Match the method to the burr. Burr size, material, geometry, and production volume determine the right process, not habit.
- Use compliant abrasives for automation. Nonwoven discs and ceramic-fiber brushes reduce gouging risk when integrated into CNC or robotic cells.
- Control force before tuning speed. Consistent contact force is the primary variable; RPM and feed rate are secondary adjustments.
- Prefer climb milling for CNC deburring. Climb milling produces cleaner edges and reduces the risk of secondary burr formation on chamfer features.
- Specify edge breaks at the design stage. DFM decisions on tool reach, clearance, and edge-break tolerances are the cheapest way to reduce downstream deburring effort.
- Use aluminum-cut carbide burrs on aluminum. Pair them with light lubrication or wax to prevent loading and extend tool life.
- Finish with nonwoven surface conditioning. After mechanical deburring, a pass with a Scotch-Brite-style nonwoven disc blends edges and removes micro-burrs without altering geometry.
- Plan filtration before integrating abrasives into machines. Spent abrasive particles degrade coolant pumps and contaminate cutting fluid if not captured at the source.
- Track consumable life and cycle-time drift. Abrasive wear is the most common source of finish variability in automated cells; log replacement intervals and scrap rates.
The highest-impact shifts for deburring in 2026 are automation-ready abrasive selection and force-controlled contact, not tool speed or operator technique alone. Products from 3M Scotch-Brite, Norton | Saint-Gobain Abrasives, and NOGA represent the current benchmark for automation-compatible consumables and hand-tool precision.
Key Takeaways
Effective deburring in 2026 depends on matching the method and abrasive to the material, geometry, and production volume, then validating every parameter on scrap before committing to production.
| Point | Details |
|---|---|
| Match method to part and volume | Burr size, material, geometry, and volume determine the correct process; no single method covers all cases. |
| Validate on scrap before production | Test tools, speeds, and abrasives on representative scrap; measure Ra and edge radius before scaling. |
| Control force first, then tune feed and RPM | Consistent contact force is the primary variable; feed rate and RPM are secondary adjustments. |
| Use compliant abrasives for automation | Nonwoven discs and ceramic-fiber brushes reduce gouging and support CNC and robotic cell integration. |
| Biax-flexwellen for confined-access deburring | Flexible shaft drives from Biax-flexwellen enable deburring in tight or inaccessible spaces where rigid tooling cannot reach. |
Table of Contents
- Which deburring method fits your part, volume, and geometry?
- What hand tools and abrasives should you prioritize in 2026?
- How do you select deburring machines and automation in 2026?
- What process parameters actually control deburring quality?
- Material-specific deburring tips: what works and what to avoid
- Safety, swarf, and environmental controls for German deburring operations
- How to keep deburring finishes consistent: maintenance and troubleshooting
- When do flexible shafts give you a deburring advantage in confined spaces?
- A note from the shop floor
- Flexible shafts for confined deburring: Biax-flexwellen engineering support
- Sources
Which deburring method fits your part, volume, and geometry?
No single method covers every case. Choosing a deburring process depends on material, part geometry, tolerances, and production volume. The table below maps each major method class to the dimensions that matter most for engineering decisions.
| Method | Best for (edge/burr size) | Finish quality (Ra/radius) | Automation friendliness | Throughput/cycle time | Risk of gouging | Maintenance/consumable cost | Material compatibility |
|---|---|---|---|---|---|---|---|
| Manual hand tools | Small batches, complex geometry, large or irregular burrs | Moderate; operator-dependent | Low | Low | Moderate to high | Low | All metals, plastics |
| CNC in-machine brushing | Precision parts, tight tolerances, moderate burrs | High; controlled Ra and radius | High (native to CNC) | High | Low with compliant tools | Medium | Metals, some composites |
| Robotic/cobot cell | Medium-to-high volume, consistent geometry | High with force control | High | High | Low with force feedback | Medium to high | Metals |
| Vibratory/tumbling | High-volume small parts, light burrs, uniform geometry | Good for Ra; limited radius control | High | Very high | Low | Low to medium | Metals, plastics |
| Thermal (TEM) | Internal/hidden burrs, complex passages | No surface finish improvement | Medium | High | None | High (gas, fixturing) | Metals only |
| Electrochemical (ECD) | Internal passages, thin-wall parts, tight tolerances | Excellent Ra; no mechanical stress | Medium | Medium | None | High (electrolyte management) | Conductive metals |
| Abrasive brushing | General edges, moderate burrs, automation-ready | Good to excellent with ceramic brushes | High | Medium to high | Low | Medium | Metals, composites |
| Media blasting | Surface conditioning, light burrs, large batches | Good Ra; limited edge radius control | Medium | High | Low | Low to medium | Most materials |
Production fit by volume and geometry:
- Prototype/low volume: Manual hand tools with swivel blades, files, and nonwoven pads. Operator skill drives quality.
- Precision/tight tolerance: CNC in-machine deburring with ceramic-fiber or compliance-based brushes. Force-controlled or compliance-based contact keeps material removal predictable and preserves dimensional targets.
- High-volume small parts: Vibratory or tumbling systems with appropriate media. Consistent geometry is a prerequisite.
- Internal or hidden burrs: Thermal deburring (TEM) or electrochemical deburring (ECD). Both reach passages that brushes and hand tools cannot.
Abrasive brushing sits in a practical middle ground. For many modern production parts, brushes offer the best balance of control, repeatability, and integration flexibility, particularly when ceramic-fiber or nonwoven types replace legacy nylon or wire brushes.
What hand tools and abrasives should you prioritize in 2026?
Prefer controlled, compliant abrasives and purpose-built deburring tools over aggressive grinding wherever tolerances and surface finish matter. The shift toward nonwoven abrasives and ceramic brushes reflects a practical industry consensus: these tool families reduce gouging, support automation, and deliver more consistent finishes than conventional flap discs or wire wheels on precision edges.
Tool families and primary use cases:
- Swivel deburring blades (e.g., NOGA-style): Ideal for cross-holes, bores, and edge breaks on turned or milled parts. The pivoting blade follows the edge contour without requiring precise operator alignment.
- Files and hand scrapers: Suited for large, accessible burrs on flat or simple curved surfaces. Effective for prototypes and low-volume work where tooling investment is not justified.
- Carbide burrs: High material-removal rate for heavy or hardened burrs. Use aluminum-cut geometry on non-ferrous materials to prevent chip packing.
- Flap discs: Common for mild steel edges and weld seam blending. Zirconia-alumina grain is the standard choice for steel; ceramic grain extends disc life on harder alloys.
- Nonwoven abrasive discs and pads (Scotch-Brite style, 3M): The preferred finishing step after mechanical deburring. Open-web construction resists loading, conforms to contours, and blends edges without removing significant material. These are automation-compatible and widely used in robotic finishing cells.
- Ceramic-fiber and UFIBER-style brushes (Norton | Saint-Gobain): Deliver controlled edge radii and fine Ra values. Ceramic abrasive grain cuts harder materials without the heat buildup associated with aluminum-oxide nylon brushes. Vendor data indicates cycle-time reductions when switching from legacy nylon brushes to ceramic-fiber equivalents.
- Radial bristle tools: Compliant by design; each bristle acts independently, making these well-suited for complex 3D surfaces and in-machine use where force control is limited.
Grain selection by material:
- Steel (mild): Zirconia-alumina or aluminum-oxide grain; flap discs and nonwoven pads.
- Stainless steel: Ceramic grain (Norton Quantum or equivalent); avoid aluminum-oxide, which glazes quickly and generates heat.
- Aluminum: Silicon carbide or aluminum-cut carbide burrs; open-web nonwoven abrasives to prevent loading.
- Titanium and superalloys: Ceramic grain at controlled speeds; minimize dwell time to prevent work-hardening.
Pro Tip: When evaluating a new abrasive product for an automated cell, request the vendor’s application note and run a controlled trial on scrap parts before production. Abrasive suppliers regularly introduce new grain chemistries and resin systems that can shorten process steps and reduce gouging risk. Staying current with vendor guidance is a practical 2026 shop discipline.
Filtration becomes a design constraint, not an afterthought, when abrasives enter a machine tool or robotic cell. Spent abrasive particles are fine enough to bypass standard coolant filters, degrade pump seals, and contaminate cutting fluid. Specify filtration capacity before the first production run.
How do you select deburring machines and automation in 2026?
Validate on scrap, confirm force-control or compliant tooling, and resolve filtration and coolant handling before committing to a machine or cell configuration. Robotic and cobot deburring adoption is driven as much by labor availability and repeatability requirements as by throughput targets. When test runs on representative scrap show consistent geometry and finish across a full cycle, automation is justified.
Step-by-step validation checklist:
- Define the burr profile. Measure burr height, location (edge, cross-hole, internal passage), and material hardness before selecting any machine or tooling.
- Run scrap trials with candidate tools. Test at least two abrasive or tool types on representative scrap. Record Ra, edge radius, and cycle time for each.
- Confirm force-control or compliance. For CNC in-machine and robotic cells, verify that the spindle or tool mount provides active force control or mechanical compliance. Fixed-mount rigid tools risk dimension drift as the abrasive wears.
- Check spindle torque and RPM envelope. Match the tool’s required RPM and torque to the machine spindle’s rated output. Ceramic-fiber brushes and nonwoven tools typically operate at lower RPM than grinding wheels.
- Evaluate workholding and part orientation. Vibration from inadequate clamping causes secondary burr formation and surface defects. Verify that the fixture holds the part rigidly at all tool approach angles.
- Assess tool-change logistics. Multi-step deburring sequences (rough removal, then surface conditioning) require tool-change capability. Confirm turret capacity or robot end-effector change-out time.
- Plan coolant and filtration. Specify filter mesh size for the abrasive type in use. Establish a coolant sampling interval to catch contamination early.
- Request consumable lifecycle data from the vendor. Ask for expected brush or disc life in parts-per-dress or parts-per-replacement under your specific material and RPM conditions.
Additional integration considerations:
- Cobot vs. full robot cell: A cobot cell is preferable when part geometry varies frequently, programming changes are needed without specialist support, or floor space is limited. Full robot cells suit high-volume, fixed-geometry production where cycle time and throughput are the primary constraints.
- In-machine deburring: Keeping deburring inside the CNC machine eliminates a separate operation and a part transfer. This is most effective when burr size is predictable and the machine spindle can accommodate a compliant brush or nonwoven tool without exceeding torque limits.
- Maintenance scheduling: Establish dressing intervals for grinding wheels, diameter-compensation offsets for worn brushes, and a scheduled replacement threshold (e.g., brush diameter reduction beyond a defined limit triggers replacement). Track these against scrap rate and surface-finish measurements, not calendar time alone.
Industrial maintenance workflow practices for abrasive-integrated setups recommend treating filtration and consumable replacement as part of the machine’s preventive maintenance schedule, not as reactive responses to quality failures.
What process parameters actually control deburring quality?
Control force and contact consistency first. Feed rate and RPM are secondary adjustments once stable contact is established. Measurement-driven acceptance targets, specifically edge radius and Ra, replace subjective visual checks in any repeatable production process.
Step-by-step parameter tuning on scrap:
- Start at the lowest effective feed rate. Light contact on the first pass reveals whether the tool is tracking the edge correctly. Increase feed only after confirming consistent contact.
- Set RPM within the tool manufacturer’s recommended range. Exceeding the rated speed on nonwoven or ceramic-fiber tools accelerates wear and can cause tool failure. Running below the minimum reduces cutting efficiency and increases heat.
- Measure Ra and edge radius after the first pass. Use a contact profilometer for Ra and an optical microscope or calibrated edge-radius gauge for radius measurement. Establish whether the result is within the drawing callout before adjusting parameters.
- Use feed rate as the primary control variable. Increasing feed reduces dwell time and lowers the risk of over-cutting. Decreasing feed increases material removal per pass. Adjust in small increments (10–15% steps) and re-measure.
- Check for tool loading after each trial. On aluminum especially, loaded abrasive cuts less efficiently and generates heat. A shiny, uncut edge after a full pass is a reliable indicator of loading rather than correct process behavior.
- Verify workholding before scaling. Vibration at production feed rates can introduce chatter marks or secondary burrs not visible during slow scrap trials.
Acceptance targets and measurement methods:
- Edge radius: Aerospace non-critical edges typically call for a 0.05–0.2 mm edge break. Confirm the drawing callout and measure with an optical edge-radius system or calibrated go/no-go gauge.
- Ra targets: General machined surfaces often target Ra 1.6–3.2 µm after deburring; sealing faces and mating surfaces may require Ra 0.4–0.8 µm or better. Use a contact profilometer (Mitutoyo SJ series or equivalent) for traceable measurement.
- Visual and tactile checks: Run a gloved fingertip along the edge after deburring. Any remaining sharp point or wire edge is a reject. Visual inspection under 10x magnification catches micro-burrs on precision aerospace edges.
Pro Tip: Integrate a passive compliance mechanism (a spring-loaded spindle mount or a pneumatic force-control unit) between the machine spindle and the deburring tool. This single change reduces operator skill dependence in manual cells and prevents dimension drift as the abrasive wears in automated cells. In-machine deburring without tolerance impact relies on exactly this principle.
For CNC deburring, match the cutter or brush form to the feature geometry, use climb milling for cleaner edges on chamfer tools, and avoid engaging the sharp tip of a chamfer cutter on the finished surface. Workholding verification before each production run prevents vibration-induced defects that are difficult to trace back to their source.
Dressing intervals for grinding wheels and diameter-compensation offsets for worn brushes must be part of the process plan, not operator judgment calls. As a brush wears and its diameter decreases, the effective contact force drops unless the CNC program compensates with an updated tool offset.

Material-specific deburring tips: what works and what to avoid
The right abrasive and method for aluminum will damage stainless steel, and vice versa. Material-specific rules reduce scrap, extend tool life, and prevent the contamination issues that arise when abrasives are shared across material families.
| Material | Recommended abrasive families | Common pitfalls | Edge-control notes |
|---|---|---|---|
| Aluminum | Aluminum-cut carbide burrs, silicon carbide nonwoven, open-web Scotch-Brite pads | Loading (chip packing), heat buildup, surface smearing | Keep pressure light; use wax or light lube; avoid zirconia grain |
| Mild steel | Zirconia-alumina flap discs, aluminum-oxide nonwoven, wire brushes for heavy burrs | Trapped scratch patterns from skipping grit steps | Progress through grits systematically; finish with nonwoven conditioning |
| Stainless steel | Ceramic grain (Norton Quantum or equivalent), zirconia-alumina for heavy burrs | Work-hardening from dwell, heat tint, cross-contamination from steel tools | Keep tool moving; use dedicated tools not shared with carbon steel |
| Plastics/composites | Abrasive brushes, fine-grit sanding, hand scrapers | Melting, delamination, fiber pull-out on CFRP | Use low-heat methods; avoid aggressive grinding; sharp tools at low speed |
Aluminum: The most common failure mode is abrasive loading. Switching to aluminum-cut carbide burrs and applying a light wax or cutting lubricant prevents chip packing and maintains tool life. Open-web nonwoven abrasives (Scotch-Brite style) are the preferred finishing medium because their structure resists clogging. Keep contact pressure low; aluminum deforms under excess force and the edge geometry changes before the burr is fully removed.
Stainless steel: Ceramic-grain abrasives cut stainless without glazing and generate less heat than aluminum-oxide alternatives. The critical discipline is keeping the tool moving. Dwelling in one spot work-hardens the surface and creates a zone that resists subsequent cutting. Heat tint on stainless is both an aesthetic and a corrosion concern on aerospace and food-contact parts; monitor tool temperature and reduce RPM if discoloration appears.
Mild steel: Zirconia-alumina grain in flap discs and nonwoven pads handles the full range from heavy burr removal to surface conditioning. The common mistake is skipping grit steps to save time, which leaves coarse scratch patterns that are difficult to remove in later finishing operations. A stepwise abrasive progression from coarse to fine preserves edge geometry and avoids distortion on thin sections.
Plastics and composites: Aggressive grinding generates heat that melts thermoplastics and causes fiber pull-out or delamination in carbon-fiber-reinforced polymer (CFRP). Use sharp hand scrapers, fine-grit abrasive brushes, or light sanding at low speed. For CFRP specifically, cutting direction relative to fiber orientation affects surface quality; test on scrap to establish the correct approach angle.
Aerospace-critical warning: On sealing faces, adhesive bond surfaces, and precision mating surfaces, edge finish must be tightly specified on the drawing before deburring begins. Any abrasive contact on these surfaces requires explicit process approval. Refer to the relevant edge finishing requirements for aerospace engineers before proceeding.
Safety, swarf, and environmental controls for German deburring operations
Secure the workpiece, use correct PPE, and manage swarf and spent abrasive from the start of every deburring operation. In Germany, disposal of contaminated abrasive media and chemical deburring agents is governed by the Kreislaufwirtschaftsgesetz (KrWG) and relevant hazardous-waste ordinances (AVV). Non-compliance carries significant liability for production facilities.
Safety checklist for deburring operations:
- PPE: Safety glasses or face shield, cut-resistant gloves, hearing protection for grinding operations above 85 dB, and respiratory protection when dry-grinding materials that generate fine particulate (aluminum, titanium, composites).
- Guards: Verify that all angle grinder and bench grinder guards are in place and correctly positioned before starting. Never remove guards to improve access.
- Spark and heat control: Keep combustible materials clear of the work area. For titanium and magnesium, have a Class D fire extinguisher accessible; standard CO2 and dry-powder extinguishers are not effective on metal fires.
- Ventilation: Provide local exhaust ventilation (LEV) at the deburring station for dry operations. Confirm airflow rates meet TRGS 900 occupational exposure limits for the specific material being processed.
- Lockout/tagout (LOTO): Apply LOTO procedures before clearing jams, changing abrasives on powered machines, or performing any maintenance on grinders, vibratory systems, or robotic cells.
- Workpiece clamping: Clamp or fixture the part securely before applying any tool. A part that shifts during deburring creates both a safety hazard and a quality defect.
Coolant and filtration:
- Spent abrasive particles from in-machine deburring are fine enough to pass through standard coolant filters. Specify a filter with adequate mesh size for the abrasive grain in use, and establish a coolant sampling interval.
- Contaminated coolant must be disposed of as hazardous waste under German regulations if it contains cutting oils, biocides, or heavy-metal residues from the workpiece material. Document disposal through a licensed waste management contractor.
- Surface preparation and debris-control practices for abrasive-integrated setups recommend wet-slurry containment trays and dedicated filtration units separate from the main coolant circuit when abrasive media volumes are high.
Environmental and regulatory notes for Germany:
- Contaminated abrasive media (wheels, pads, brushes saturated with cutting oil or metal fines) are classified as hazardous waste under AVV code 12 01 21 (spent grinding bodies) or 12 01 20 (spent grinding materials containing dangerous substances). Segregate and label containers correctly.
- Chemical deburring agents (electrochemical or acid-based) require storage in bunded areas, neutralization before disposal, and documentation under the Wasserhaushaltsgesetz (WHG) for water-protection compliance.
- Airborne particulate from dry grinding must be captured and disposed of per TA Luft emission limits. Wet-grinding setups reduce airborne particulate but generate contaminated slurry that requires separate handling.
How to keep deburring finishes consistent: maintenance and troubleshooting
Schedule checks for abrasive wear, tool geometry, and system filtration. Variability in edge finish almost always traces back to one of three sources: worn abrasive, a changed tool offset, or degraded coolant. Catching these early prevents scrap accumulation.
Maintenance checklist:
- Dressing intervals: For grinding wheels, dress on a fixed parts-count or time interval, not when finish quality visibly degrades. Establish the interval during scrap trials and document it in the process plan.
- Abrasive replacement thresholds: Define a minimum brush diameter or disc thickness below which the tool is replaced. For ceramic-fiber brushes, a diameter reduction beyond the manufacturer’s wear limit changes contact force and finish quality even if the brush appears functional.
- Spindle and collet checks: Inspect collets for wear and runout at each tool change. Excessive runout on a deburring spindle causes chatter marks and inconsistent edge radius.
- Brush wear measurement: Measure brush diameter at each scheduled maintenance interval. Log the measurement against parts produced to establish a reliable replacement cadence.
- Filtration system inspection: Check filter condition and coolant concentration at the same interval as abrasive replacement. A clogged filter is a leading indicator of abrasive contamination in the coolant circuit.
Troubleshooting flow:
- Shiny, uncut edge after a full pass: Likely cause is tool loading or insufficient feed rate. Corrective action: increase feed rate, check abrasive for loading, switch to an open-web nonwoven or aluminum-cut geometry if on aluminum.
- Inconsistent edge radius across a batch: Likely cause is abrasive wear mid-batch or a tool-offset error. Corrective action: check brush diameter, verify CNC tool offset, and re-run a scrap trial.
- Chatter marks or surface waviness: Likely cause is inadequate workholding or excessive spindle runout. Corrective action: re-torque fixture clamps, inspect collet, and reduce RPM.
- Heat tint on stainless or titanium: Likely cause is excessive dwell time or RPM. Corrective action: increase feed rate, reduce RPM, and verify coolant flow to the contact zone.
- Rapid abrasive wear: Likely cause is incorrect grain for the material or excessive contact force. Corrective action: switch grain type, reduce programmed contact force, and consult the abrasive vendor’s application note.
Data to track and review cadence:
Track consumable life (parts per replacement), scrap rate (parts rejected for edge quality), and cycle-time drift (time per part increasing as abrasive wears). Review these metrics weekly during initial production and monthly once the process is stable. A rising scrap rate combined with increasing cycle time is a reliable signal that abrasive replacement intervals need adjustment.
When do flexible shafts give you a deburring advantage in confined spaces?
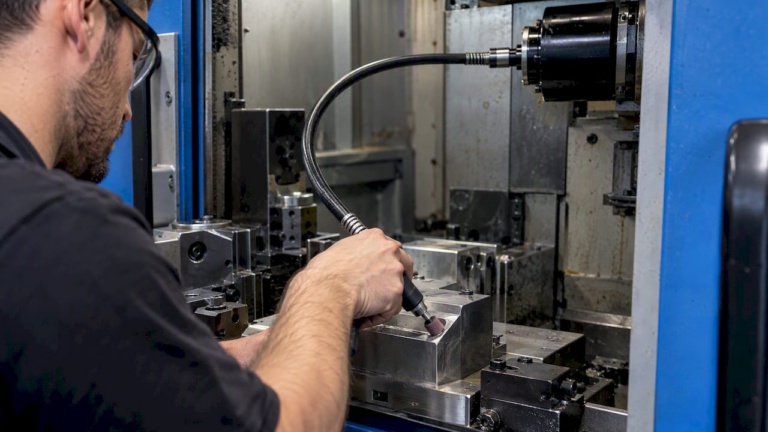
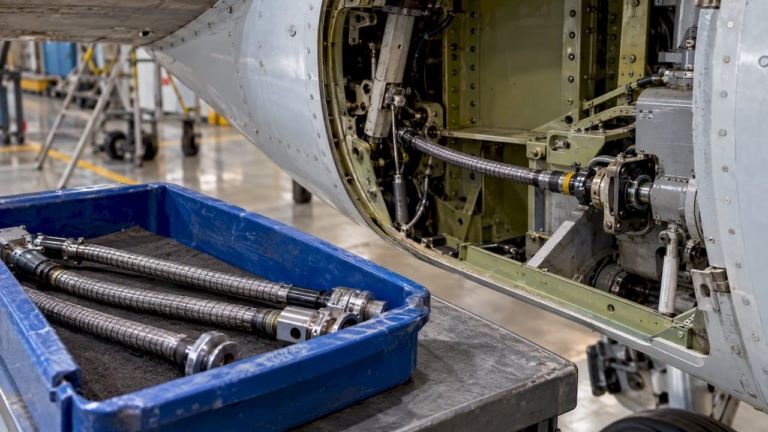
Flexible shafts are a practical solution for deburring tasks where rigid tooling cannot reach the work surface due to geometric constraints, installation depth, or assembly interference. This applies directly to aerospace structures: actuation housings, synchronization shaft assemblies, thrust-reverser subassemblies, and valve-override access points all present configurations where a rigid spindle cannot be positioned at the required angle or depth without disassembly.
Design checklist for flexible-shaft deburring integration:
- Required torque: Establish the torque demand of the deburring tool (brush, burr, or nonwoven disc) at the operating RPM. Flexible shafts have a rated continuous torque; exceeding it causes premature wear or failure.
- Maximum RPM: Confirm the shaft’s rated RPM limit for the selected length and bend radius. Longer shafts and tighter bend radii reduce the maximum safe operating speed.
- Allowable runout: Specify the maximum runout at the tool end. Excessive runout causes chatter and inconsistent edge radius, particularly on fine deburring passes.
- Coupling interface: Match the shaft’s output coupling to the tool holder (collet, hex drive, or custom interface). Mismatched couplings introduce runout and create retention risks.
- Shaft length and routing: Route the shaft to avoid sharp bends below the manufacturer’s minimum bend radius. Swarf and coolant exposure along the shaft path require protective sheathing.
- Shielding from swarf: Specify a protective outer sheath rated for the coolant and abrasive environment. Metal swarf can abrade unprotected shaft casings and cause premature failure.
- Balanced mass: For rotating finishing heads, verify that the tool assembly is balanced to avoid vibration at operating RPM.
Aerospace application examples:
- Deburring inside actuation housings after final machining, where bore depth and adjacent structure prevent rigid tool access.
- Finishing on synchronization shaft assemblies where the shaft must be dressed in situ without removal from the airframe.
- Service access in thrust-reverser subassemblies for edge conditioning on fastener holes and mating flanges.
- Confined valve-override systems where a straight grinder cannot be positioned within the installation envelope.
Integration notes:
- Prefer nonwoven or ceramic-fiber brush tools at the flexible-shaft output for deburring. These tool types generate lower reaction torques than carbide burrs and are less likely to snag or stall the shaft.
- Use a collet-style tool retention system rather than a set-screw holder to minimize runout and prevent tool ejection under load.
- Schedule inspection of the shaft casing and coupling at the same interval as the deburring tool replacement. Flexible shafts in abrasive environments wear from the outside in; casing damage is visible before internal wire damage occurs.
- Document the shaft’s bend radius and routing in the process plan. Changes to the installation that alter the routing geometry change the shaft’s effective torque capacity and RPM limit.
For specification support on torque, RPM, coupling interfaces, and shaft routing for confined deburring tasks, the Biax-flexwellen engineering team provides application guidance. A practical guide to removing burrs in manufacturing covers integration considerations in detail.
A note from the shop floor
Deburring is consistently underestimated at the planning stage and overworked at the production stage. The pattern repeats: a process is designed without specifying edge breaks, burrs appear at assembly, and technicians spend unplanned hours on manual finishing. The tips in this guide reflect what actually reduces that gap. Test-first validation on scrap, force-controlled contact, and material-matched abrasive selection are not theoretical preferences; they are the operational decisions that separate consistent production from chronic rework. Automation earns its place when the scrap trials prove it, not before.
Flexible shafts for confined deburring: Biax-flexwellen engineering support
When rigid tooling cannot reach the work surface, a flexible shaft drive is often the most direct solution. Biax-flexwellen (Schmid & Wezel GmbH) designs and manufactures industrial flexible shafts configured for deburring, grinding, and finishing in constrained installations. The engineering variables covered include torque rating, RPM limits, shaft length, bend radius, coupling interface, and protective sheathing for abrasive environments.
Flexible shafts are particularly useful in these situations:
- Deburring inside deep bores, actuation housings, or enclosed assemblies where a rigid grinder cannot be positioned.
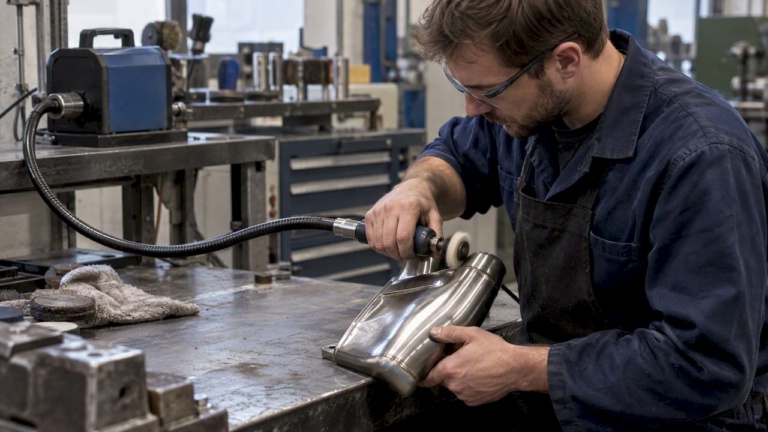
- Rotating polishing or brushing heads that require a remote drive source due to space or weight constraints.
- Tool access inside assembled structures for in-situ edge conditioning without full disassembly.
For engineers specifying a flexible shaft for industrial manufacturing applications, Biax-flexwellen supports both standard configurations and custom shaft designs matched to specific torque, RPM, and routing requirements. Contact the engineering team directly to discuss application parameters and receive a specification recommendation.
Sources
- How to Deburr in the CNC Machine Without Affecting Tolerances | XEBEC® Deburring Technologies
- The essential guide to deburring tools, techniques and tips
- Sheet Metal Deburring: Methods & How to Deburr Metal
- What Is the Best Deburring Technique? | Industrial Guide
Recommended
- Remove Burrs in Manufacturing: A Practical Engineer’s Guide – BIAX Flexwellen
- Why Burr Removal Is Critical for Manufacturing Engineers
- Edge Finishing for Aerospace Engineers: A 2026 Guide
- How flexible shafts enhance precision deburring in manufacturing
Related Topics
Send your spec inquiry
Custom flexible shafts for your application — we quote within 1 working day.